Showing posts with label Splashy Mix Challenges. Show all posts

Tuesday, May 12, 2020

Recycled wood tray

Hi crafty friends,  Maria Pilar is here sharing with you a recycled wood tray using May Moodboard

I love strawberries and I usually keep the wooden boxes where they come from. I need a tray for my job and decorated one of those boxes. This is my recycled work.

I have used orange acrylic paint as the background, which I covered with hand-cut pieces of tissue paper. Once dry, I gave it more color using gelatos of the colors orange, pink and green.
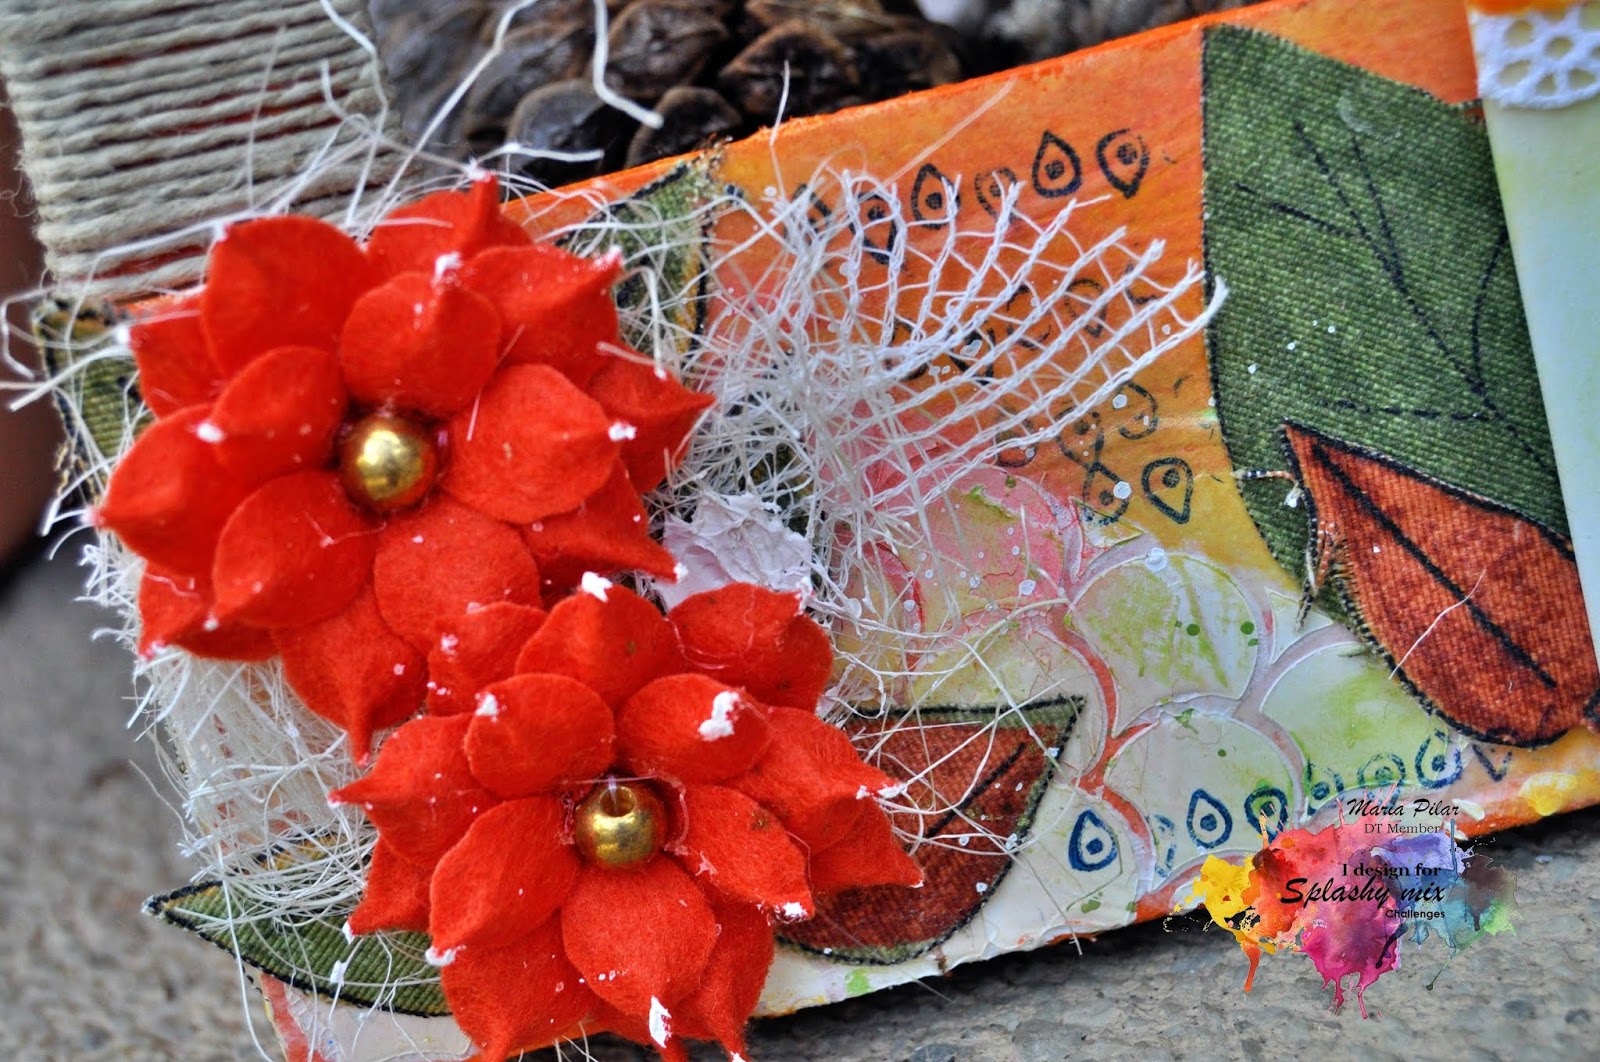
The decoration is made with paste highlighted with a stencil, cloth leaves, paper butterflies, felt flowers from @CreativeMinds, some sisal, gauze, jute thread and @Joy Clair stamps.

Close up pictures


I hope you like this recycled box.

*************************************************************************
Prizes

- we will award two people: 
1. One topmost Winner - Will be chosen by our DTs.
2.  One Runner up - we will draw from among all the works.
3. Top 5 projects will be chosen by DTs

**************************************************************************
Sponsors

Creative Embellishments - Winner will receive 30 USD Gift voucher.


*****************************************************************************
One Runner up will receive Rs.500 worth goodie bag from Letzcraft.


  • Website - http://www.letzcraft.com/
*******************************************************************************
Click on the SPONSORS tab above to know them in detail.
Like their pages and follow them for additional points


*******************

We are waiting for your inspirations for Splashymix Challenge, sharing in our Facebook group.
Have a very nice day!

Tuesday, April 14, 2020

Mirror frame - mixedmedia tutorial

Hi crafty friends,  Maria Pilar is here sharing with you a mirror frame mixedmedia I made for April Moodboard Challenge
This month our sponsor is ITD collection and I used Creative Set RS008 Summertime in blue, one of their rice paper set, to decorate my mirror frame Malma, from Ikea.   

Tuesday, March 10, 2020

Life is Art. Paint Your Dreams ...

Welcome everyone to our March Moodboard Challenge here at  

Here is this month's inspiring moodboard.  I just love the colour scheme. 


I have created this mixed media canvas  inspired by the moodboard. 


Some closer looks.


I hope my canvas inspires you and that you will join us this month.  Just create your project and enter it here.   If you want to know more about my project and the steps and products I used please see my blog In Search of My Creative Side.

Prizes

- we will award two people: 
1. One topmost Winner - Will be chosen by our DTs.
2.  Random prize - we will draw from among all the works.
3. Top 5 projects will be chosen by DTs


*****************************************************************************
Sponsors

One winner will receive Rs.1000 worth goodie bag from our Main sponsor - Connect 4 Sale

Connect4Sale

 Connect4Sale is a one stop shop for Art And Craft Supplies, Children's Books, Accessories & Unique Stationery. If crafting is your hobby, you will find a lot of craft materials (Scrapbook Materials, Decoupage Materials, Mixed Media Materials, Art Supplies, Stamps, Cutting Dies, Embellishments, Ribbons, Tapes, Tools, Jewelry Making Materials, DIY Kits, Children's Crafts Materials and more) for children and adults


*****************************************************************************
One random winner will receive Rs.500 worth gift voucher from Creative Genie.


Website - www.creativegenie.in
****************************************************

Click on the SPONSORS tab above to know them in detail.

Like their pages and follow them for additional points


*****************************************************************************
You can submit several works for the challenge, but please - no more than three.

The challenge lasts until 31/03/2020. Winners will be announced on 3rd April 2020.


Stay tuned to month-long inspiration from our team.  


Monday, May 6, 2019

Rustic Altered Clock

Hi Judy here, with my inspirational project for May's rustic challenge.

Create any mixed media project incorporating inspiration from the below Moodboard


I was inspired by this rustic look and decided to create a reversed canvas on a wooden frame and use parts of an old wind up clock along with other findings from my boxes of treasures. 

This is my old clock I found at a thrift store. 


This is my completed creation.


To create my project I turned my wooden frame backwards and painted it copper brown. stamped with surface with a set of rubber stamps that were time related. Once I had the frame painted I added Patine blue antiquing solution. 

 To create the layers in my frame I used several plastic lids out of my recycling box.  I added the inside of the clock and some of the other clock piece to the design. When you move the project the clock still sometimes starts ticking. 

I added many other pieces to the frame such as a couple of butterflies, clock front from Graphic Fairy, sentiment, metals, image from Tim Holtz and other findings.

Here are some closer looks:


Hope you will join our challenge this month. 

Remember

- Your work must be new, not previously published anywhere
- You can create any mixed media project corresponding to the moodboard and the colors presented in the moodboard are also accepted.
- You can enter upto 3 entries.
- The post should contain a banner, a link to our challenge and the name of the blog.
- Last date to submit your works 28th May until 23:55 !

Prizes

INTERNATIONAL CHALLENGE WINNER
(as voted by our DT)

$30 USD value prize from CREATIVE EMBELLISHMENTS

NATIONAL CHALLENGE WINNER
(as voted by our DT)

Rs. 500 Value prize from Die Cuts and More


3 DT Favourites
(as voted by our DT, in no particular order)

One DT favourite will receive Goodie bag from Letzcraft Store and will be our Guest Designer the following month 


1 Random Winner
(chosen by Random.org)

One Random winner from Indian Participants will get a goodie bag worth Rs.500 from Creative Minds


We are grateful to all our generous sponsors for Supporting our brand new challenge

Image may contain: 1 person, smiling, text


Tuesday, February 19, 2019

Key to My Heart Mixed Media

Hello! And welcome back to our 2nd challenge to Splashy Mix Challenges! I'm Jeanie Ellis, also known as Scrapbookingmamw! Below is our very lovely and romantic moodboard for this month's challenge. Plus, some great prizes to be given away!


Now on to Our Prizes:

INTERNATIONAL CHALLENGE WINNER
(as voted by our DT)

$30 USD value prize from CREATIVE EMBELLISHMENTS

NATIONAL CHALLENGE WINNER
(as voted by our DT)

Rs. 1000 Value prize from Die Cuts and More


3 DT Favourites
(as voted by our DT, in no particular order)

One DT favourite will receive Goodie bag from Letzcraft Store and will be our Guest Designer the following month 


1 Random Winner
(chosen by Random.org)

One Random winner from Indian Participants will get a goodie bag from Creative Minds

Now on to my project for this month's challenge. I made a process video so you could see how I made my project I titled "Key to My Heart". I know that it's past Valentine's Day, but we still call it the Love Month, right? Here it is:


Here's a summary of the process, step by step:
Step 1: Prepare surfaces by adding Gesso.

Step 2: Brush on your base coat (I used FolkArt Metallic Garnet Red)

Step 3: Begin adding layers. I used different types of pastes and metallic acrylic paint by Prima Art Alchemy. (Listed in video)

Step 4: Stencil, using Textured Paste. Use heat gun to dry

Step 5: I started using various mist sprays to add color, drying in between coats

Step 6: Add glitter paste in various areas

Step 7: I then took my lace heart and used the same base color as the key 

Step 8: While the heart finished drying, I then took my "LOVE" and painted it a purple base coat (a little later you'll see I also painted around the edge, which can be done in this step too).

Step 9: Back to the heart- I added different layers of embossing powders, ending with a holographic powder to give it more shine and depth.

Step 10: I then took my "XOXO" and pressed it into my VersaMark and sprinkled gold embossing powder on top of it. 

Step 11: I added clear embossing powder onto my heart. The reason I do these in the order I did, is to give each piece a little extra "setting time". 

Step 12: I took my LOVE and added red geranium and then holographic embossing powders. With the last layer of embossing powder, and while still warm, I sprinkled mountain ice glitter and pressed lightly

Step 13: I wasn't happy with the key, so I went back to it and added more embossing powders and glitter paste. I took a DecoColor paint pen (gold) around the side of the key and heart, plus on the top edge of the key.

Step 14: Glue it all together, and it's done! 

Here are photos of the finished project:


Thanks for stopping in! I hope that this will give you inspiration to try something and join in on the challenge!

Wednesday, February 13, 2019

Mixed Media Layout

Hi everyone
Priya Satish this side saying big hello to all. Tomorrow is Valentine's Day and here's a mixed media layout to inspire you. I was inspired by the romantic theme and colours from the moodboard. I have a detailed step by step photo tutorial for you.


This is the romantic lovely moodboard for this month's challenge. We have some great prizes on the offer. 

Prizes

INTERNATIONAL CHALLENGE WINNER
(as voted by our DT)

$30 USD value prize from CREATIVE EMBELLISHMENTS

NATIONAL CHALLENGE WINNER
(as voted by our DT)

Rs. 1000 Value prize from Die Cuts and More


3 DT Favourites
(as voted by our DT, in no particular order)

One DT favourite will receive Goodie bag from Letzcraft Store and will be our Guest Designer the following month 


1 Random Winner
(chosen by Random.org)

One Random winner from Indian Participants will get a goodie bag from Creative Minds

Now let's get to the tutorial.
Took a Pattern Paper and removed the centre portion and distressed with Seedless Preserves Distress ink.

Mixed the same colour with modelling paste and applied through Kaiser Craft Stencil. 

Deckled the edges of the paper and distressed it. 

Took 2 sheets of another pattern paper of size 3"/12" and made the fan fold. Adhered the edges together to form the doily

Rubbed the same colour over the folds.

Adhered my focal picture to Expressions Craft Chipboard.

Stuck lace around the edges of a white card stock. This is going to be my base.

Pasted the doily to the base.

Adhered the pink base to the white base.

Added my central element. Coloured a piece of gauze cloth with same colour and added to the base.

Added flowers from the Expressions Craft White Rose and Indian Pink Rose collections.

Added chipboard embellishments from Expressions Craft.

Added more interest with pollens and stones.

Adhered sequins and used liquid pearls on the background.

Finally added some Expressions Craft deco stones, micro beads and the quote. Splashed some pinks to the background to complete my project.  


Hope you liked it. Have great day!!!